 In this article, we’ve decided to pay particular attention to project creation, a topic of significant importance. Indeed, no mining plan can be implemented without a comprehensive project for its execution. Not a single day in an operating open-pit mine can run successfully without a detailed project for working specific areas. Similarly, no mining program can be approved without an associated project, and so forth. Whatever our objective might be, a project—whether detailed for a particular mining area with descriptions of key excavation aspects or a global design outlining development directions and boundaries—is indispensable at every stage.
Depending on our ultimate goal, an appropriate set of tools can be employed to achieve the optimal outcome in the shortest possible timeframe.
Any self-respecting design engineer must understand all the methods of designing open-pit mines and waste dumps within their working environment. This knowledge provides clarity on which method best fits a particular task. Our software solution integrates numerous design approaches, including manual, automatic, and semi-automatic methods.
While numerous design tools exist today—from simple 2D solutions to more complex software—we want to showcase our achievements in constructing three-dimensional digital projects, which rival those created with other programs. In fact, our approach and flexibility even surpass those of other solutions.
In general, these can be divided into three categories:
- Manual Method – specifically designed to meet detailed planning needs where every small detail matters. It’s most suitable for short-term planning, precise drafting, or detailing smaller mining areas. Although it can be used for larger areas, other available tools would significantly reduce time expenditure.
- Semi-Automatic Method – designed primarily for shaping open-pit shells, waste dumps, and other large standalone design elements without considering ramps initially. Ramp integration must be performed manually, adjusting positions of individual lines and points. This method works well for assessing pit depth potential and the geometric limits of dumps. It’s also effective for quickly estimating excavation volumes and allows users to move efficiently into more detailed design phases.
- Automated Method –significantly reduces the time required for design tasks. As for how you utilize the time saved—enjoy a coffee, invest in self-development, or inform management and receive another assignment—the choice is yours.
Next, let’s delve into details on each method, exploring their key aspects, optimal use-cases, and more.
Manual Method
This method incorporates numerous user-configurable tools which, when used together, enable the creation of projects of any complexity. While this article does not aim to cover the entire design module’s functionality, we seek to illustrate which commands best suit specific tasks. Consider this a design guide of sorts.
Let’s imagine each object within the open-pit mine consists of fundamental components such as top and bottom berm lines, ramps, and other elements. The manual method involves incrementally building each element step-by-step, integrating everything into one cohesive “organism”—the project.
When designing an open-pit mine starting from the pit bottom, the pit floor can be represented by the bottom berm of the lowest bench. Next, we must design the ramp leading to the second-lowest bench, along with the top berm of the lowest bench. This can be most efficiently executed using the Construct Ramp command. Its extensive customizable options enable users to minimize additional manual adjustments.
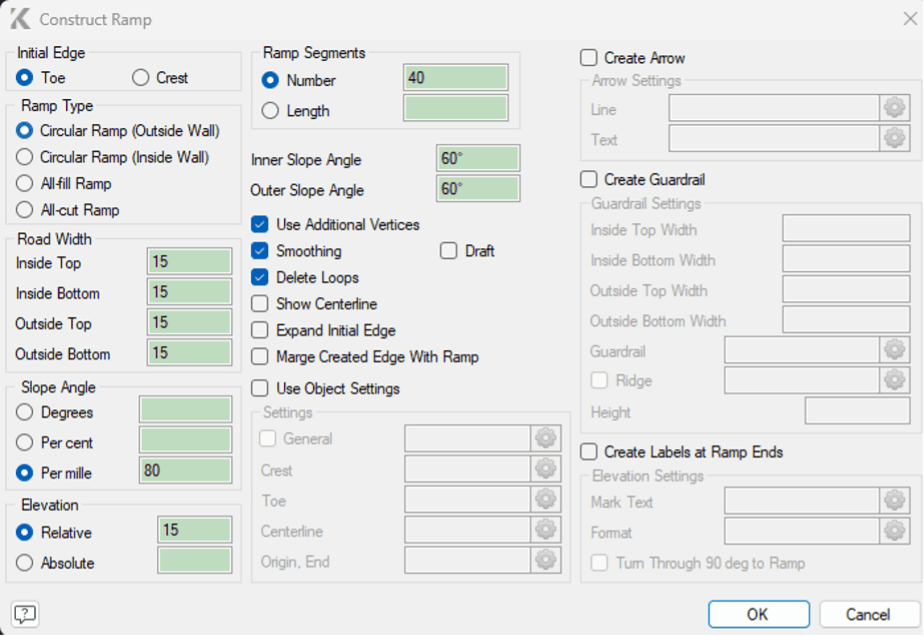
The process of ramp construction itself is dynamic, allowing the user to choose both the direction and side of construction relative to the reference line.
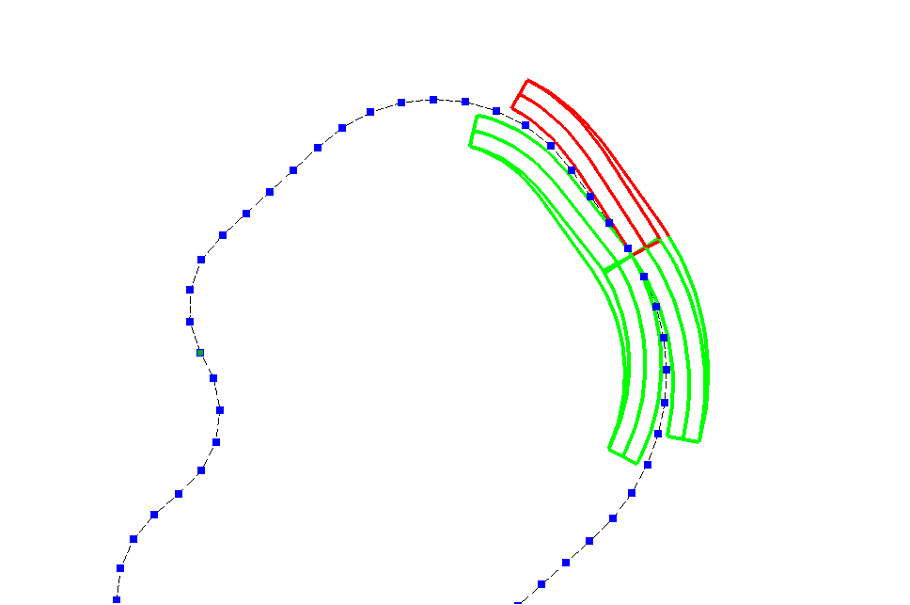
After a few adjustments, we can observe a completed section of our project. Thus, the lower bench can essentially be constructed using just one command—Construct Ramp.
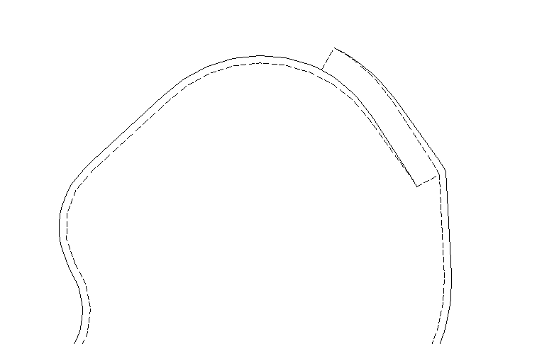
The next logical step involves creating a safety berm, or alternatively, defining the bottom berm of the next higher bench. The most suitable command for this purpose is Offset Line. This command enables diverse types of constructions, such as offsetting a line from a reference line by distance and height, by distance and angle, or by height and angle. These three settings significantly assist engineers across all stages of design.
For instance, by selecting the offset by distance and height method and setting the height parameter to zero, we can construct a berm quickly. The construction proceeds interactively, giving the user the choice of the direction relative to the reference line. Furthermore, the settings permit the execution of multiple offsets simultaneously, offsets to both sides of the reference line, and customization of the constructed line’s parameters, among other options.
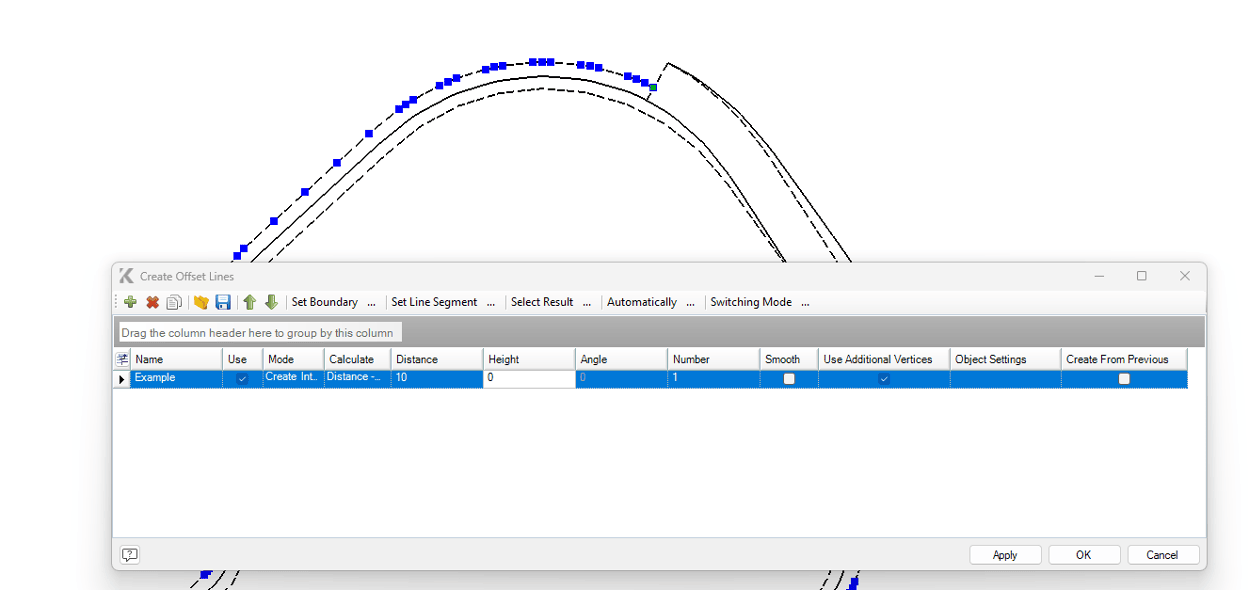
Next, you need to perform another ramp construction to establish yet another bench. Thus, step by step, we build our pit upwards, adjusting individual points when necessary.
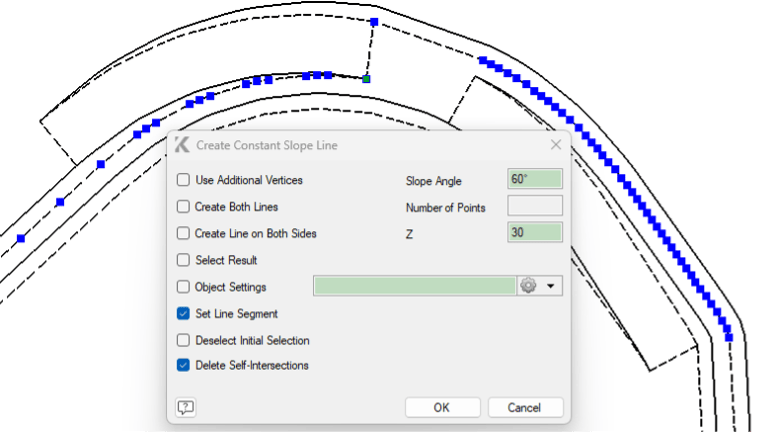
Now let’s examine what can be done when part of a berm or the entire upper berm is missing. In such cases, we need to construct the top berm from the lower one. Numerous commands could accomplish this, but the most commonly used is Line with Constant Slope Angle.
This command provides settings to specify precisely what needs to be constructed, the slope angle (negative values construct downward, positive upward), the target elevation or reference elevations, and whether to construct a segment or the entire line, among other parameters.
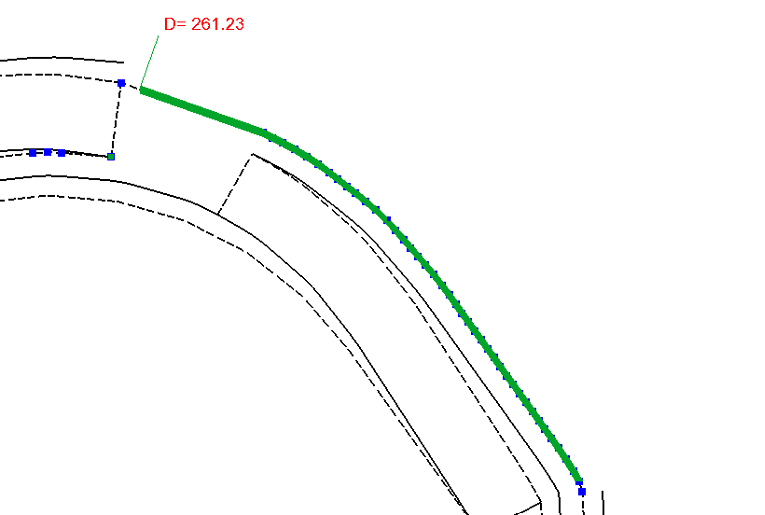
Another common challenge for designers is constructing a line with a given slope angle directly onto an existing surface or wireframe. Again, this can be efficiently handled using the Line with Constant Slope Angle command. By selecting the target wireframe, specifying the reference line, and setting the desired number of points, the construction is executed flawlessly.
If the task involves fitting an existing line precisely onto a wireframe surface, the appropriate command is Recalculate by Wireframe from the Edit menu. Subsequently, you select whether additional points should be created or maintain the current number. As a result, the line will align perfectly onto the wireframe surface.
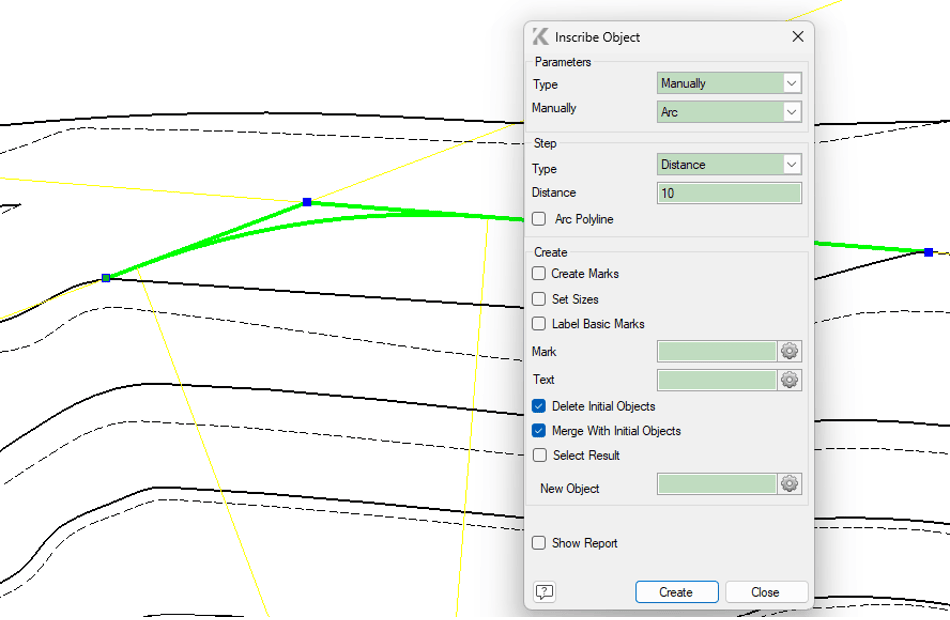
Addressing smoothness in construction, K-MINE provides the capability to smoothly inscribe objects. Let’s illustrate how this works and why it is beneficial. Suppose you need to design an actively mined face. You can initially construct a simple polyline of three points tangent to the actual surface and then inscribe the object into the resulting angle. The Inscribe Object command itself is multifunctional, providing flexible settings to achieve the desired result. Smoothness will be ensured according to the specified parameters.
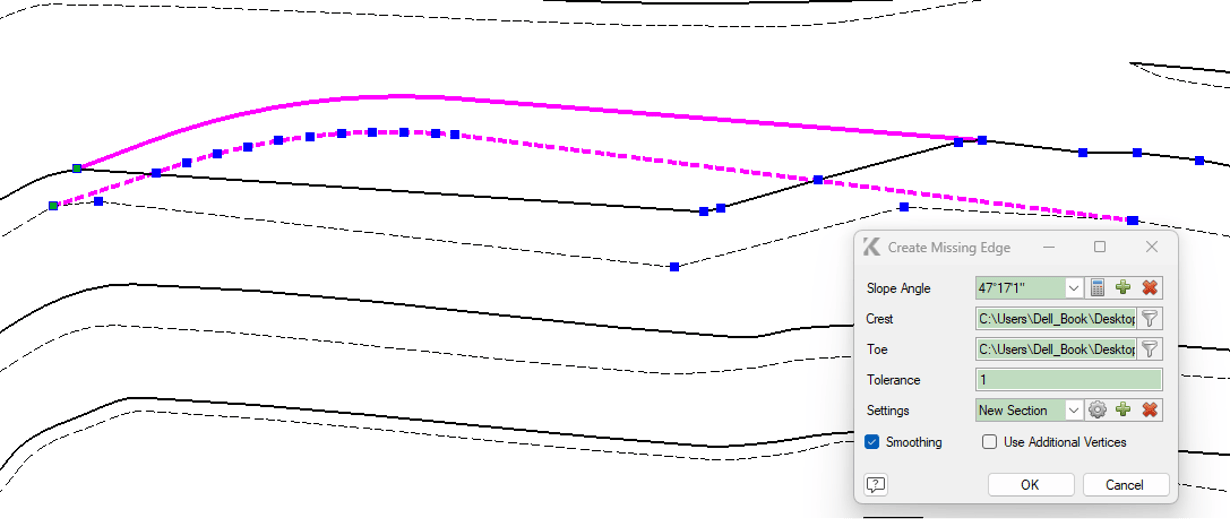
Now we have successfully created a good-quality upper berm; the only thing left is to construct the lower one. Since we’ve already discussed two methods, let’s explore another convenient option suitable for this particular case. Here, we don’t even need to specify the slope angle manually—it will be calculated automatically. We can use the Create Missing Edge command. With the correct selection order (starting with the initial position and then the design line) and the appropriate pre-configured settings, the construction can be completed in just a few mouse clicks.
Next, let’s consider adjusting designed lines to match actual field conditions. To perform this, the designed and actual berm lines must intersect and be of the same type. Select the relevant lines and use the Reshape Lines command. In an instant, berm lines adjust to their new positions, removing the previous outlines.

In this context, it would be inappropriate to overlook essential line-editing elements available within the Edit menu. Here are the primary commands that no design engineer can do without:
- Split – divides a line at a specified point.
- Cut by Line – splits a group of objects using a defined cutting object.
- Merge Objects – connects the end of one object to the start of another.
- Close Boundary – closes an open contour.
- Recalculations – projects an object onto a surface, recalculates coordinates, and performs other recalculation tasks.
- Vertices – edits the number of points in an object.
- Delete Part of Line – this one is self-explanatory.
- Trim/Extend Objects – also quite straightforward.
These are merely the fundamentals, indispensable in design practice. The complete set contains numerous additional tools, enabling you to achieve desired results when designing objects of any complexity.
Finally, concluding our examples of manual design methods, let’s explore how we might construct the upper berm dynamically, based on specified parameters and considering volumetric data. Using the Select Volumes command, the user can quickly determine the exact boundary of excavation—the final pit face location—depending on the desired volume of excavated material. By setting excavation boundaries, your design becomes as precise as possible. You can also specify a particular volume target, the required working platform width, and much more. Ultimately, this results in a clearly defined upper berm that fully meets the set criteria.
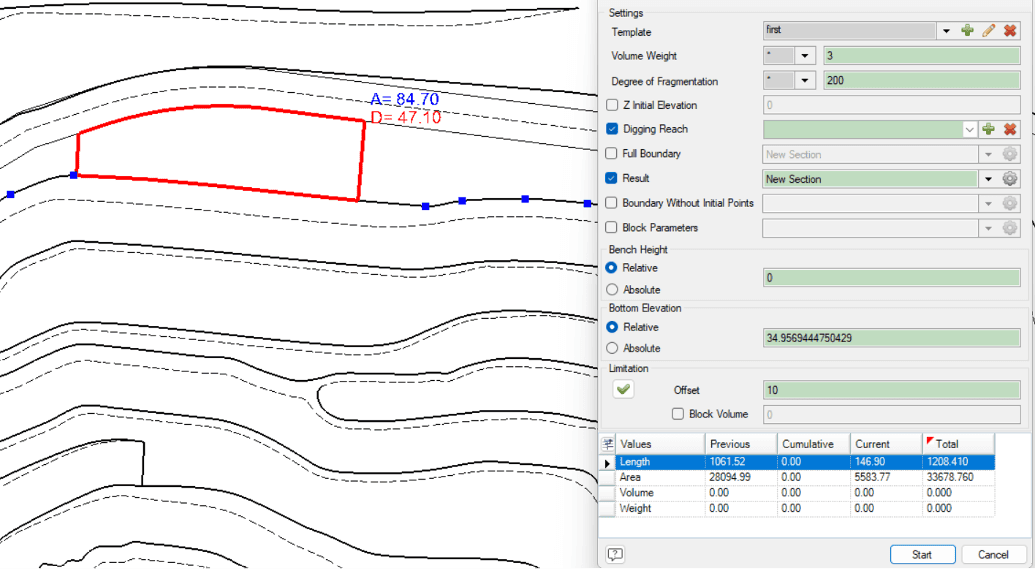
This tool can significantly assist during short-term planning. Gathering excavation volumes for machinery has now become much easier. You only need to determine where exactly to allocate these volumes in advance, although entirely different tools exist specifically for that purpose.
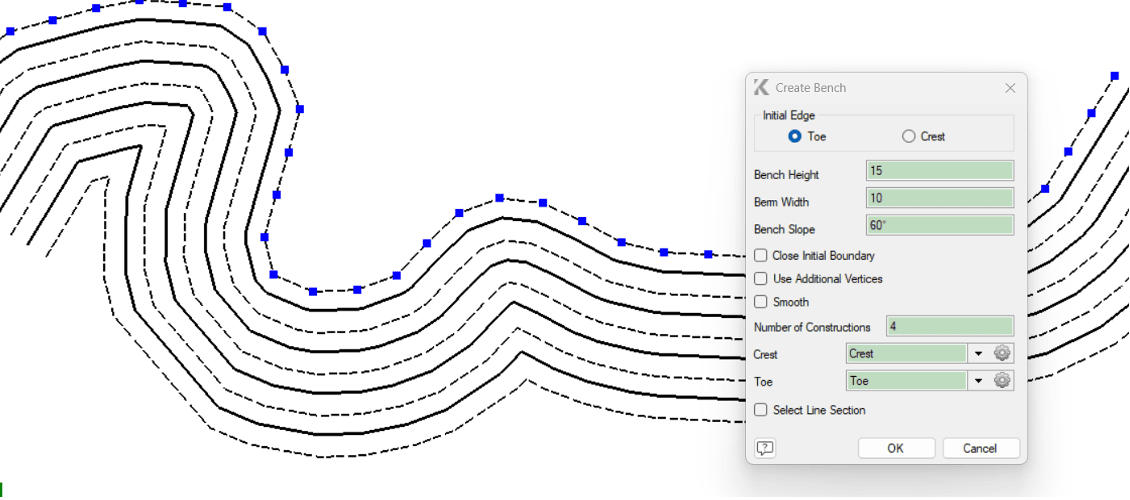
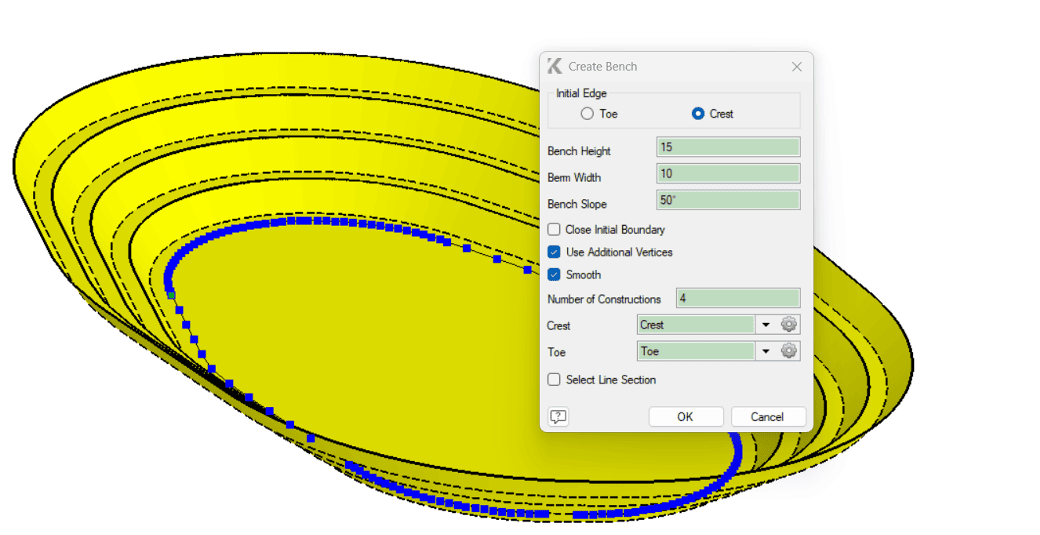
Moving on, the next subsection we can identify is the semi-automatic construction of pit berms or waste dumps. Starting with a single berm line, we can easily generate two additional ones. The configuration options here are straightforward and intuitive.
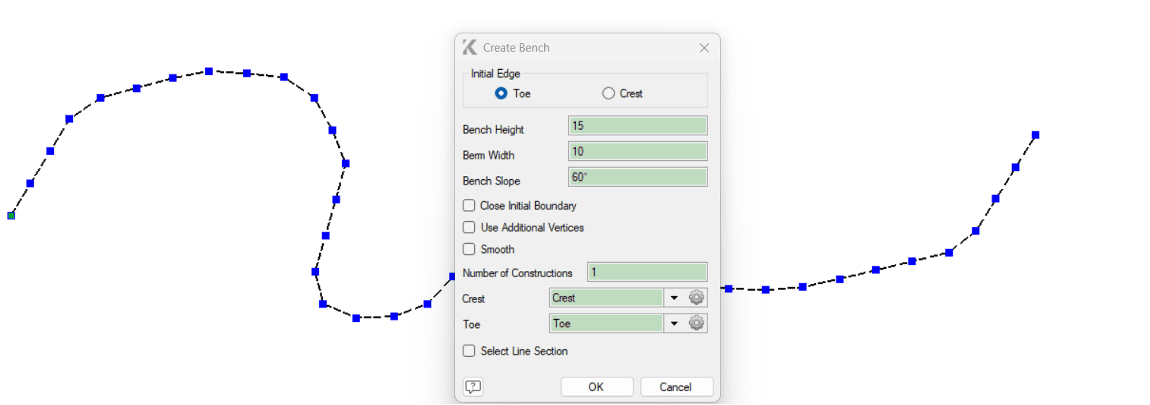
Thus, you can create a bench within mere seconds, employing only a minimal yet sufficient number of settings. A particular convenience offered by this method is that it enables you to construct not only one bench but an entire group of benches simultaneously. With a closed contour, you can swiftly obtain a complete design of a pit or dump—though excluding roads, which must be added manually. But don’t worry, we have many more exciting features, and we’ve saved the best ones for last.
Another highly useful function applicable across various aspects of a design engineer’s workflow is Create Lines by Cross-section With this tool, you can efficiently design extensive sections of pits, waste dumps, storage facilities, roads, infrastructure networks, and much more.
To utilize this function effectively, you must first have a predefined cross-section, which the tool references while generating objects. Within the task itself, you’ll need to specify precisely how each point on the cross-section will be constructed—defining object types and configurations for each point. Once you click the button to execute the command, a comprehensive set of drawings instantly appears, perfectly corresponding to your cross-section and specified settings. Below are some illustrative examples of what can be constructed using this method.
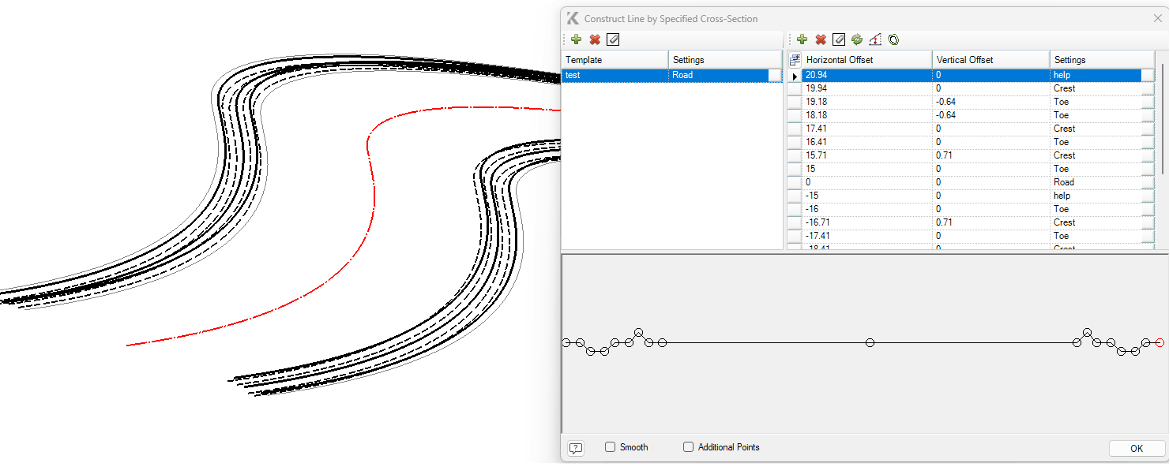
Moreover, using Snapping and the various general design and editing tools, you can produce detailed excavation passports and comprehensive mining operation guidelines. Leveraging the full capabilities of multiple modules within a single environment provides significant advantages.

Finally, we’ve saved the most exciting feature for last—Dynamic Design. With this feature, designers no longer need to worry about spending excessive amounts of time designing large-scale structures. Now, whether it’s an open-pit mine or waste dump, complete with roads, you can achieve your design within just minutes. All you need is a single closed line and a list of bench elevations, created in a semi-automatic mode by simply specifying the main parameters and number of benches. Once you’ve configured the elevations and selected the construction type (pit or dump, top-down or bottom-up), you’re ready to execute your initial design.
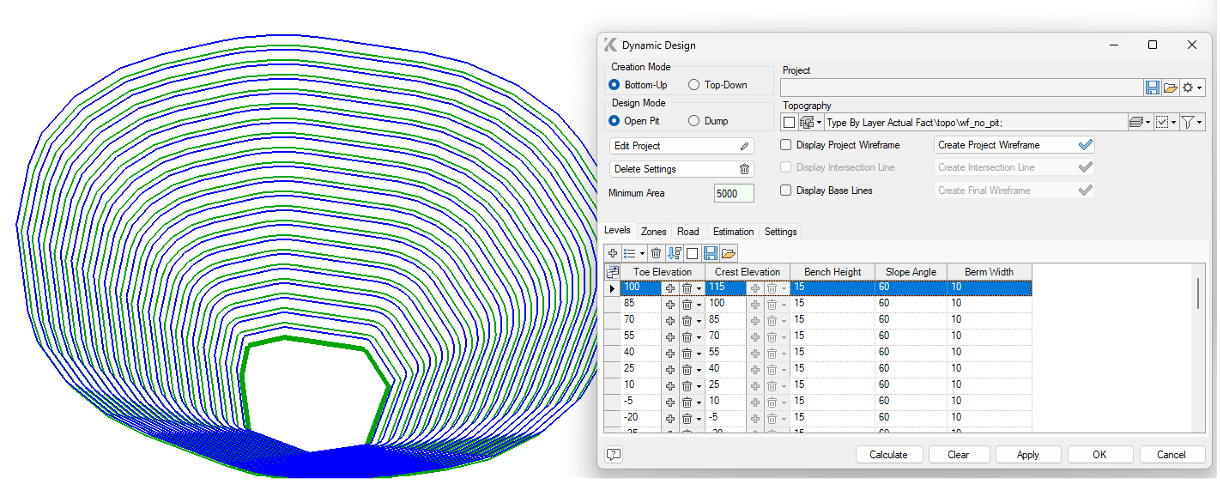
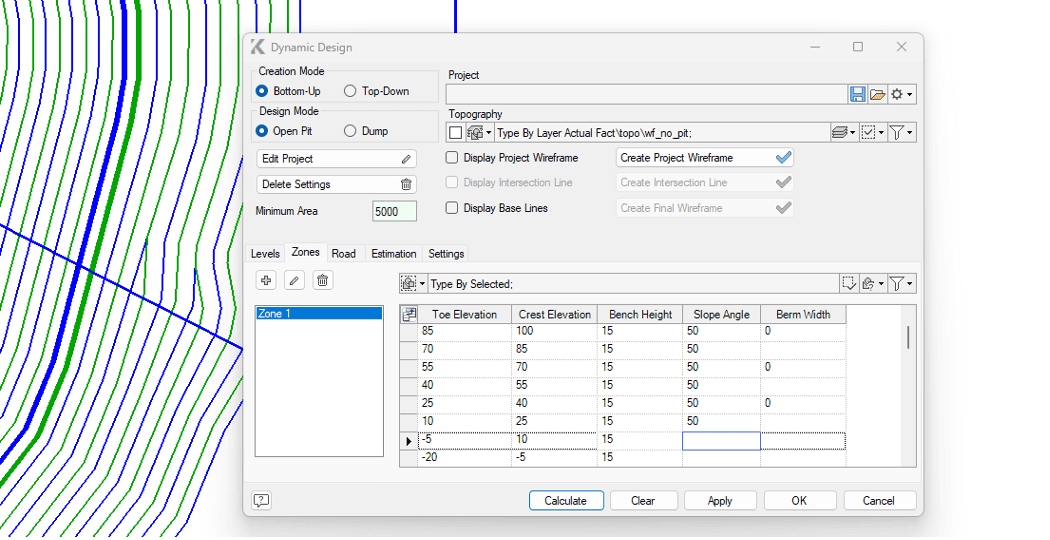
В In most practical scenarios, a pit isn’t perfectly uniform—it typically has varying slope angles across different zones, dictated by tectonics, lithology, and deposit hydrogeology. Precisely to accommodate such unique requirements, we’ve implemented functionality allowing you to set customized parameters for each distinct mining area using individual polylines. This feature is available in the Zones tab. For example, you could define a gentler slope angle for upper benches, while inactive sections of the pit could have their own distinct parameters.
No open-pit mine can exist without roads, so we’ve made the process of dynamically adjusting road locations as intuitive and convenient as possible. After setting basic road parameters, simply choose the starting point. The road is then automatically generated along the shortest feasible route from the pit bottom to the top.
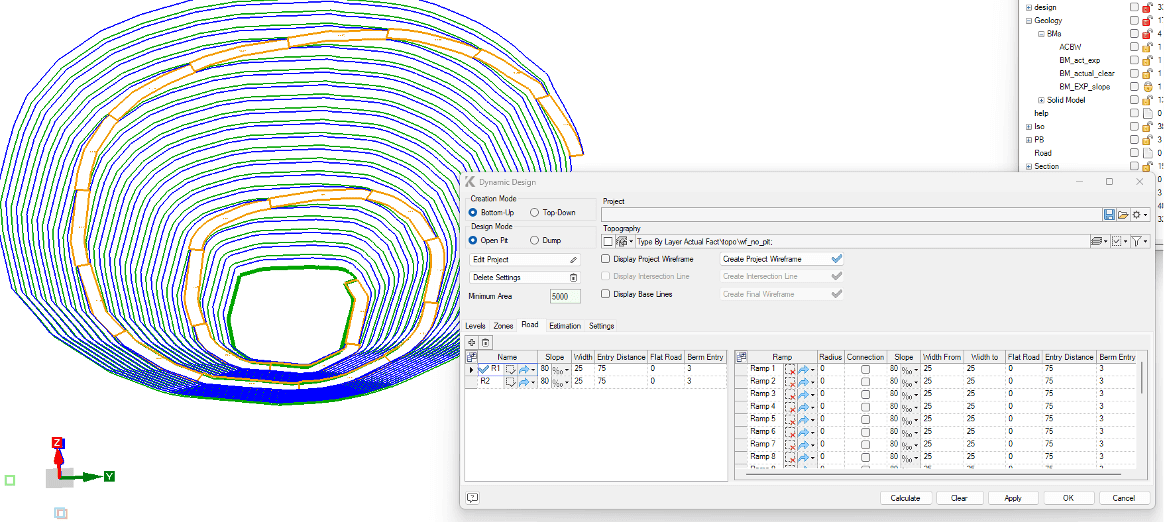
The direction of a road can be adjusted either from its starting point or at any selected position along its path, which will be treated as a switchback. The width of these turning areas can also be expanded to accommodate a safe turning radius for large-scale haul trucks.
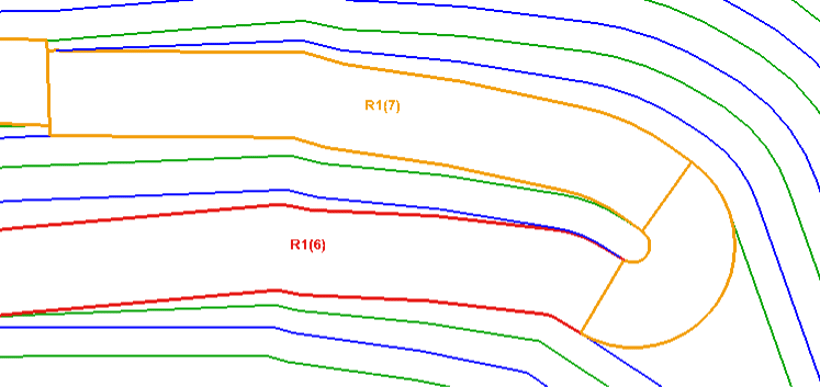
Additionally, to facilitate the link between graphical elements and tables, numerous auxiliary visualizations and indicators have been developed. It’s nearly impossible to miss something unless intentionally trying to do so—guidance is provided at every step.
When project complexity increases, additional roads may be introduced, sometimes resulting in inevitable intersections. In such cases, users are given multiple options for managing intersections effectively. They may decide whether to stop one road and continue with a switchback on the other side, halt both intersecting roads and initiate a third road segment, or add two separate switchbacks.
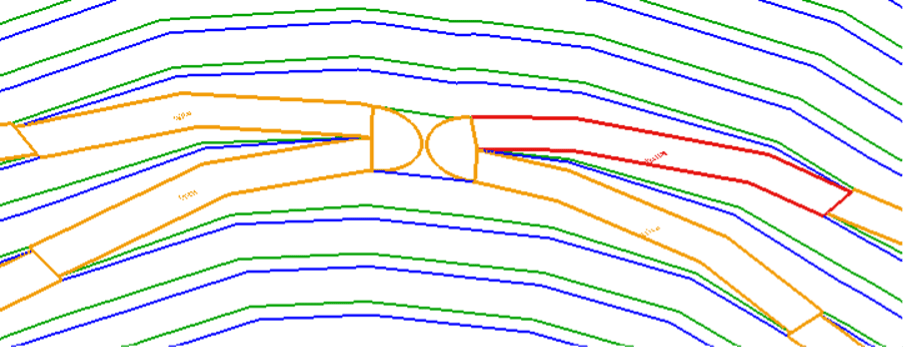
Furthermore, when multiple switchbacks are located at a considerable distance from each other, it’s possible to automatically generate a connecting road segment between them. This is easily managed by the Connection checkbox. Users simply need to activate it at the appropriate location, ensuring the road connects at the same elevation. This functionality is not limited to switchbacks alone; it also applies to discontinued road segments or combinations thereof.
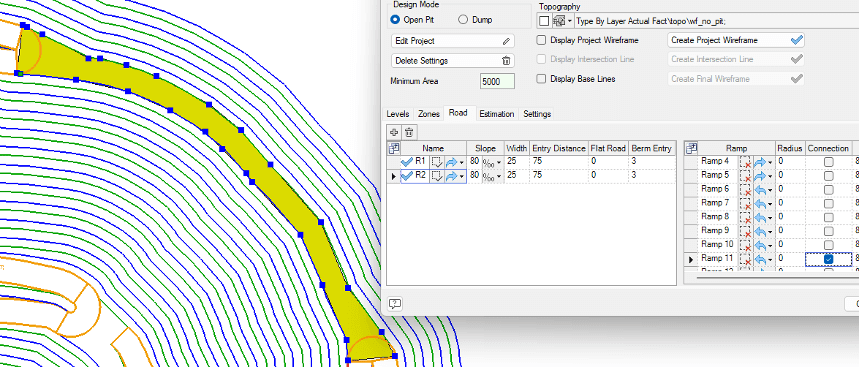
Thanks to advanced editing capabilities, the user can always intervene in the automatic pit-creation process and apply necessary adjustments, which instantly become incorporated into subsequent constructions and propagated throughout the entire project.
In the main window, there are commands for visualizing various elements, guiding users precisely when needed.
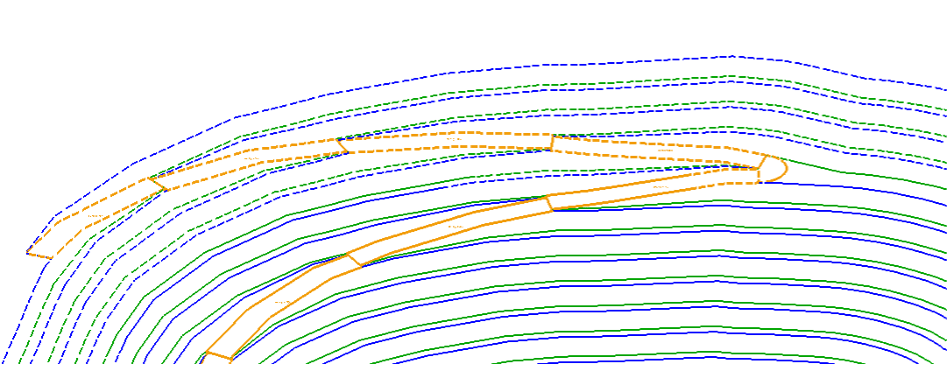
While the generated project itself is undoubtedly impressive, it isn’t perfect until it’s effectively aligned with the local topography or actual mining operations in the pit. Parts of the designed pit located above the actual terrain are visually represented by dashed lines.
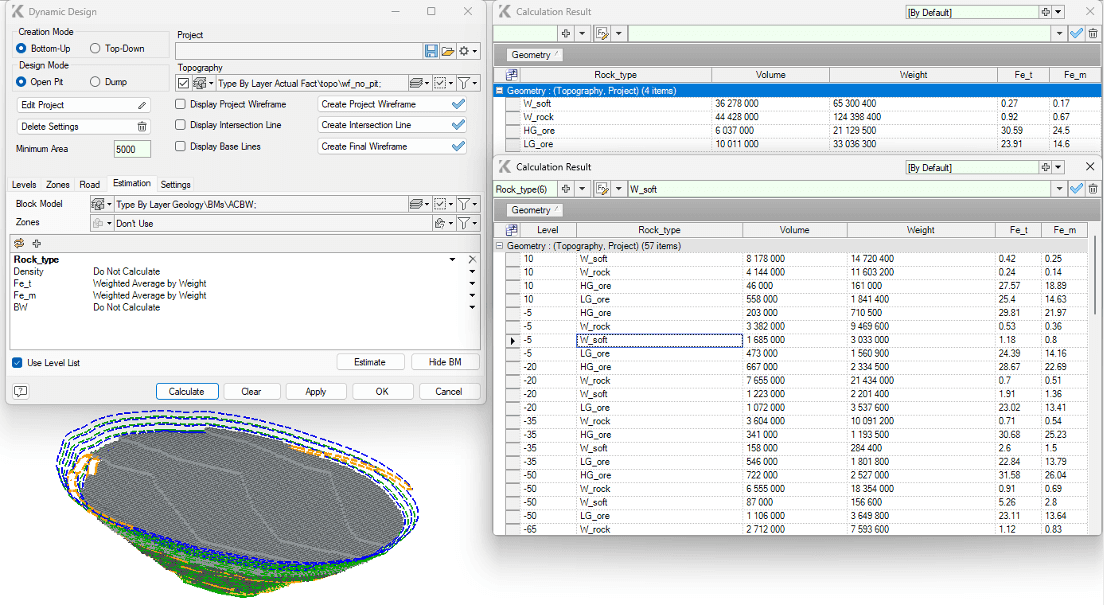
Once the topographic surface and the pit design are activated together, it’s important to verify how effectively the deposit is being exploited. This is the ideal moment to evaluate volumes within the current project. Navigate to the Estimation tab, apply the block model, set the parameters, and check the results. Incidentally, you can also calculate volumes by horizons or even define and calculate separate zones independently.
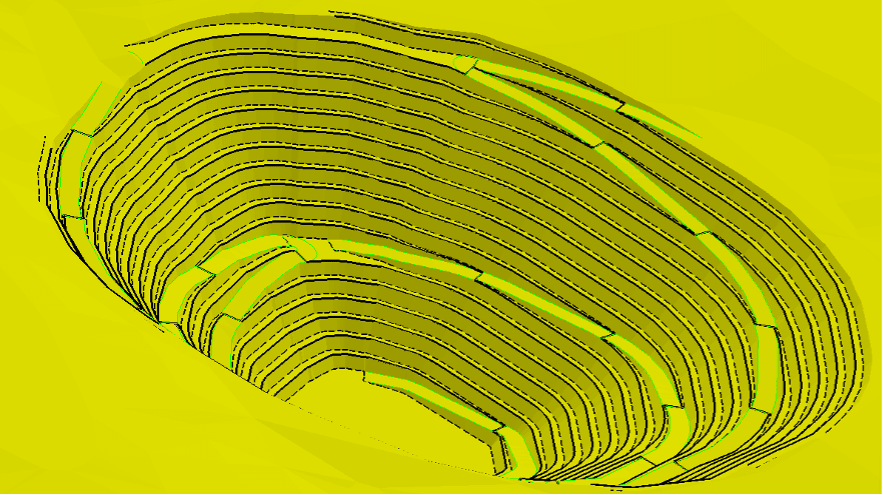
Once we’re fully satisfied with our design and the calculated volumes are in order, we can perform the final construction, merging the designed surfaces with actual site conditions using the Create Final Wireframe command. The concluding touch in this construction is generating design lines based on specified parameters. Notably, all resulting lines can be automatically organized into separate sublayers according to their elevation.
It seems this overview provides a sufficient depth of functionality suitable for both beginners and experienced design engineers. The ease of configuration, flexibility, and diversity of options will surely impress even the most demanding project specialist.
Choose your own style, create custom menus, assign commands to hotkeys, define your preferred workflow—and enjoy the result!





 Back
Back
